超絶初心者(自分)のためのWordPressのテーマ作成-6
今回はadd_theme_support()関数を追加して、テーマに便利な機能をさらに追加していきます。
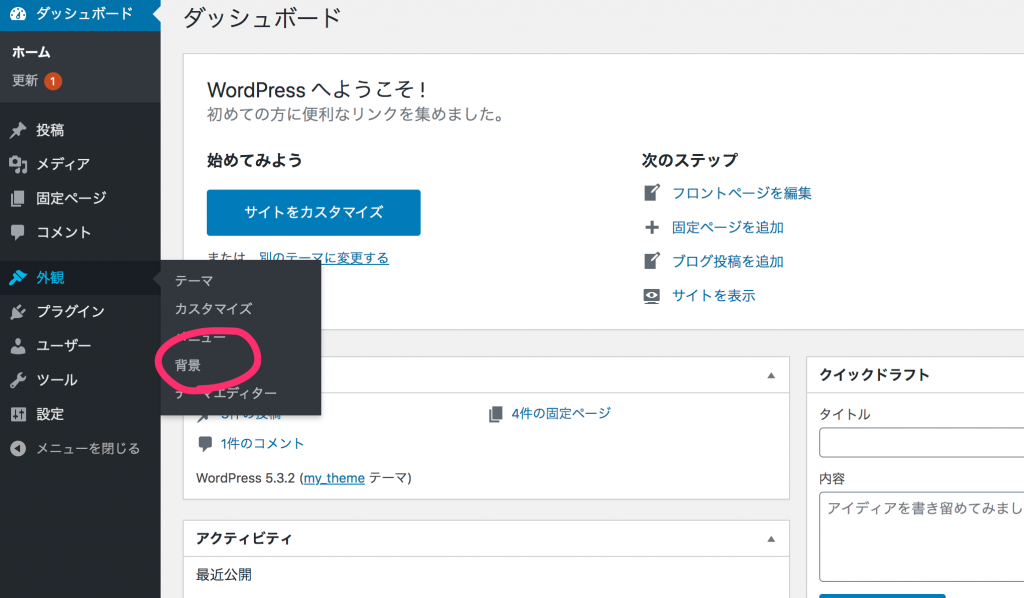
まずはcssを触らずにページの背景を変えられるようにする関数。
add_theme_support('custom-background');この関数をfunctions.phpに追加してあげるとこのようにダッシュボードから背景が変えられる機能が追加される。
functions.phpの追加後のコード
<?php

function my_theme_script_enqueue(){

    wp_enqueue_style('customstyle', get_template_directory_uri() . '/css/my_theme.css', array(), '1.0.0', 'all');
    wp_enqueue_script('customjs', get_template_directory_uri() . '/js/my_theme.js', array(), '1.0.0', true);
}

add_action('wp_enqueue_scripts', 'my_theme_script_enqueue');

function my_theme_setup(){
  // 外観(Apperance)からカスタムメニューを見えるようにする
  add_theme_support('menus');
  //ここカスタムメニューを定義する。 register_nav_menu('場所','説明')
  register_nav_menu('primary', 'Header Navigation');
  register_nav_menu('secondary', 'Footer Navigation');
}

add_action('init', 'my_theme_setup');

add_theme_support('custom-background');
次に紹介するのがヘッダーをダッシュボードからいじれるようにする関数。
add_theme_support('custom-header');これを追加すると背景と同じようにヘッダーがcssをいじらずに変更できるようになる。
しかしここで気をつけないといけないのは背景と違い、この一文を追加しただけではまだ反映されないので以下をheader.phpに追加する。
<img src="<?php header_image(); ?>" height="<?php echo get_custom_header()->height; ?>" width="<?php echo get_custom_header()-> width ?>" alt="" />
functions.phpの追加後のコード
<?php

function my_theme_script_enqueue(){

    wp_enqueue_style('customstyle', get_template_directory_uri() . '/css/my_theme.css', array(), '1.0.0', 'all');
    wp_enqueue_script('customjs', get_template_directory_uri() . '/js/my_theme.js', array(), '1.0.0', true);
}

add_action('wp_enqueue_scripts', 'my_theme_script_enqueue');

function my_theme_setup(){
  // 外観(Apperance)からカスタムメニューを見えるようにする
  add_theme_support('menus');
  //ここカスタムメニューを定義する。 register_nav_menu('場所','説明')
  register_nav_menu('primary', 'Header Navigation');
  register_nav_menu('secondary', 'Footer Navigation');
}

add_action('init', 'my_theme_setup');

add_theme_support('custom-background');
add_theme_support('custom-header');
add_theme_support('post-thumbnails');
header.phpの追加後のコード
<!DOCTYPE html>
<html>
  <head>
    <meta charset="utf-8">
    <title>my_theme site</title>
    <?php wp_head();?>
  </head>
  <?php
  if(!is_home()):
    $my_classes = array('thisIsHome', 'yeahIAmHome');
  else:
    $my_classes = array('IAmNotHome');
  endif;
  ?>
  <body <?php body_class($my_classes); ?>>

    <?php wp_nav_menu(array('theme_location'=>'primary'));?>

    <img src="<?php header_image(); ?>" height="<?php echo get_custom_header()->height; ?>" width="<?php echo get_custom_header()-> width ?>" alt="" />
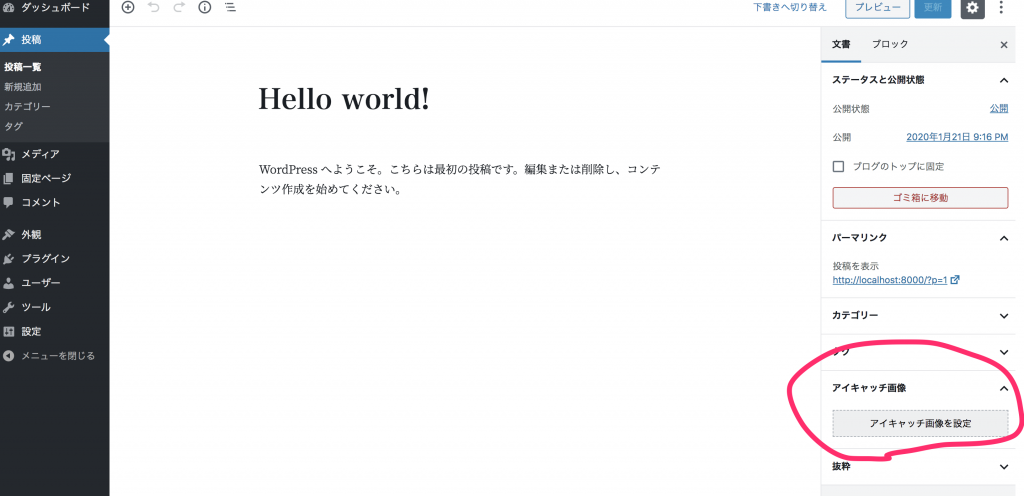
次はダッシュボードからサムネイル画像を追加できるようにする関数。
add_theme_support('post-thumbnails');これを追加すると以下のようにアイキャッチ画像という項目が投稿ページに追加され、サムネイル画像を追加できるようになる。
ただこのままだとまだページには反映されないので、へーダーの時にやったようにサムネイルを表示するため以下のコードをindex.phpに追加する。
<div class="thumbnail-img"><?php the_post_thumbnail('thumbnail') ?></div>*the_post_thumbnail()関数の引数にthumbnailを渡すことによってwordpressが画像をサムネイル用のサイズに自動的にしてくれる。
index.phpの追加後のコード
<?php get_header(); ?>

  <?php
  if(have_posts()):
    while(have_posts()): the_post(); ?>

    <h3><?php the_title() ?></h3>
    <div class="thumbnail-img"><?php the_post_thumbnail('thumbnail') ?></div>
    <!--  the_time()で記事の投稿された時間を表示し、the_category()で記事のカテゴリーを表示 -->
    <small>Posted on: <?php the_time(); ?><?php the_category(); ?> </small>
    <p><?php the_content() ?></p>

    <hr>

    <?php endwhile;
  endif;
  ?>
<?php get_footer(); ?>
この他にももっとたくさん便利な関数が 用意されているので興味がある方はadd_theme_supportで調べて見てください。
それでは今回はここまで!